Pages

Showing posts with label Water. Show all posts

Thursday, September 26, 2019

My Investigation of climate change

Hi everyone! Welcome to another post today we are going to be talking about acidification along with climate change and how they affect our oceans. Also talking about other things.

ACIDIFICATION
Definition
Acidification is the process of acid being added to water.
Questions

What is happening to our oceans?

  • The ocean absorbs the carbon dioxide in the atmosphere, but there is too much.
  • So carbon dioxide affects sea life and how it grows.
  • Sealife like shells, reefs and others are getting affected by the acid.

What does this do to shellfish?

  • The acid affects the shells production cycle and it also affects the shape of the shell. 
  • The shells are no longer allowed to reproduce due to the acidified waters.
  • We won't be able to get fresh shells because there is too much-acidified water. 

HOW DOES CLIMATE CHANGE CONTRIBUTE TO THE ACIDIFICATION OF OUR OCEANS?


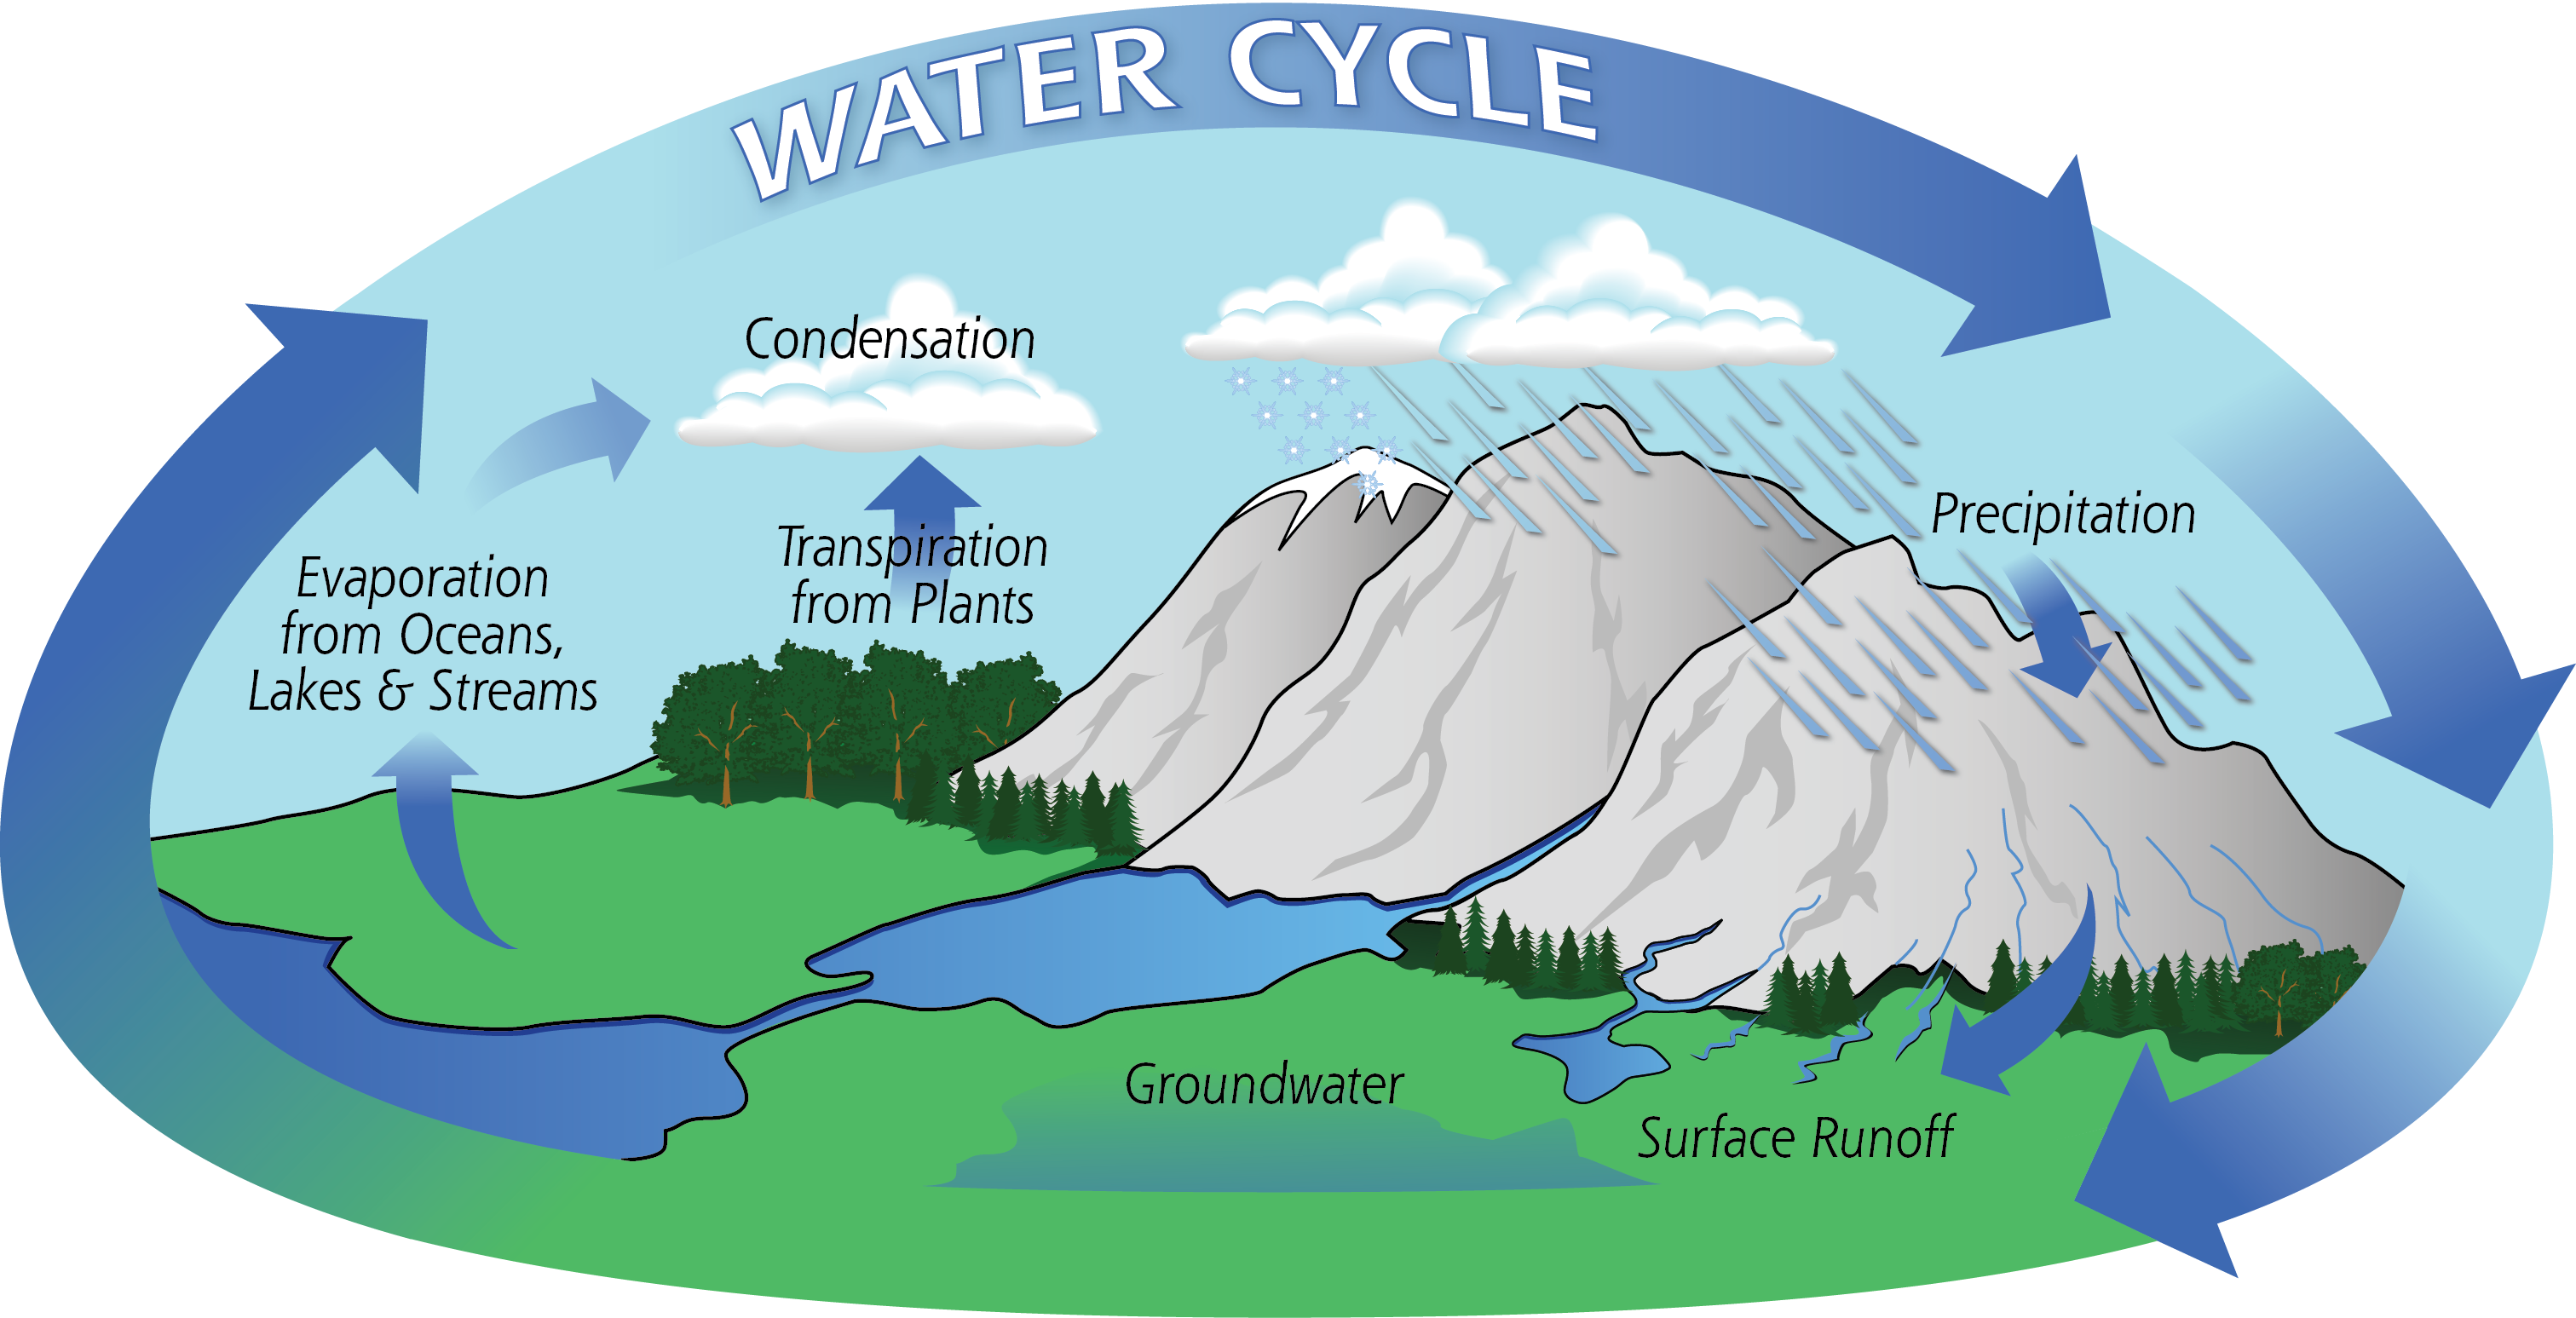
Climate change contributes to acidification because the acid enters our water cycle and affects how the rain falls.

2 Images:
Image result for acidification
Credit: https://www.iucn.org/theme/marine-and-polar/our-work/climate-change-and-oceans/ocean-acidification

Image result for acidification

DEFORESTATION
Definition
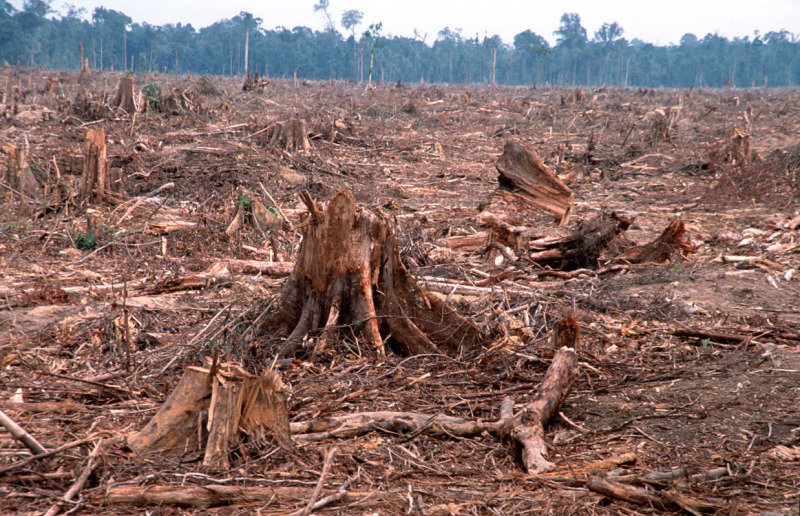
Deforestation is the process of cutting trees.

Questions

What are trees used for?

  • Trees are used for desks, pencils, chairs, and some buildings.
  • It is also used to make cabinets, picture frames and doors.
  • They are also used to suck up carbon dioxide and make oxygen.

HOW DOES DEFORESTATION AFFECT THE CLIMATE?

Deforestation affects the climate because when cutting trees carbon dioxide is released and the carbon dioxide then acts like a greenhouse gas that makes the climate warm. 

2 Images:
ICECAP MELT 
Definition 
Icecap melting is the process of the ice in Antarctica melting. 
Questions

If all the ice melt what would happen?

  • If the ice melt the sea levels will rise a large amount and the melted ice will cause flooding.
  • If it melted the current of the sea would change and it could affect how the sea life migrates.
  • It would also affect the way sea life lives if the icecap melts the melted ice will turn into freshwater and some of the living creatures of the sea will die from it.

HOW DOES ICECAP MELT AFFECT CLIMATE CHANGE?

It will affect our climate because there wouldn't be a lot of ice to make our world a bit colder. The rising sea level will flood some parts of the world and trees would be underwater and we wouldn't have any trees to suck up the carbon dioxide.

Saturday, September 21, 2019

Water Cycle.

AIM: TO LEARN ABOUT WATER ON EARTH.

Definition:

Related image

Scientific words:

  • Evaporation. When water is heated by radiant energy it turns into water vapour.
  • Transpiration. Evaporation from plants.
  • Condensation. When water vapour cools, molecules join together and form clouds.
  • Precipitation. When clouds get heavy the waters falls as rain, sleet, hail, or snow.
  • Acidification: the action or process of making or becoming acidic.

THE WATER CYCLE SONG

Image result for the water cycle

THE WATER CYCLE EXPERIMENT

Bag 1: Normal Water cycle
Bag 2: Water cycle with CO2 added: like Oceans in climate change
Bag 3: Water cycle with ice added: like Antarctica in climate change


Title: Water Cycle Experiment 

Purpose: To learn how the water cycle works and to learn the impact of pollution in our water. 

Materials:
  • 2 ziplock bags,(A4 sized)
  • 200ml of water
  • Soda water - 50ml
  • Litmus paper 
  • Vivid Marker
  • Baking Soda 
  • Blue Food colouring 
  •   tape

Procedures:
Experiment A
  1. Get a vivid marker and draw land with mountains and clouds.
  2. Name each step of the water cycle.
  3. Then add some water.
  4. Then add some blue food colouring.
  5. Put 20cm of double-sided tape.
  6. Take off the side of the tape and set it inside a window facing the outside.
  7. There you have the water cycle.
Experiment B
  1. Get a vivid marker and draw land with mountains and clouds.
  2. Name each step of the water cycle.
  3. Add some soda water - 50ml.
  4. Add some baking soda, 1 teaspoon.
  5. Then add some blue food colouring
  6. At the middle of your ziplock, it locks put a strip of litmus paper in the middle and zip.
  7. Put 20cm of double-sided tape.
  8. Take off the side of the tape and set it inside a window facing the outside.
  9. There you have a water cycle with CO2 added. (Carbon Dioxide)

Conclusion:
This experiment tells us more about the water cycle and how it works. In the experiment it showed us how the water cycle would normally work, while the other one showed us more about when CO2 is added to the water. 


Findings:


The Water Cycle
Acid Water Cycle
Does it cycle?
11
Amount of Water
21
Acidity
01

Key: Water and acidity amount: 0 = none 
1 = small 
2 = large 

Other comments:

The water cycle did cycle, it has a large amount of water and there is no acidity in the water cycle because there is no added CO2. The acid water cycle did cycle, it has a small amount of water and it has small acidity. 

Conclusion:

Thursday, September 5, 2019

The Water Cycle!

Hi everyone! Today I will share with you my procedural writing about the water cycle experiment. The experiment was about making our own mini water cycle on a zip lock bag. But the purpose of the writing was to show people how to make there own mini water cycle.

First, we had to make a draft then get feedback from our writing buddies, after that we do our final drafts and self asses our selves.

Here is my writing.

Title: Water Cycle Experiment 


Purpose: To learn how the water cycle works and how it affects our world. 


Materials:
  • 2 ziplock bags,(A4 sized)
  • 200ml of water
  • Soda water - 50ml
  • Litmus paper 
  • Vivid Marker
  • Baking Soda 
  • Blue Food colouring 
  •   tape


Procedures:
Experiment A
  • Get a vivid marker and draw land with mountains and clouds.
  • Name each step of the water cycle.
  • Then add some water.
  • Then add some blue food colouring.
  • Put 20cm of double-sided tape.
  • Take off the side of the tape and set it inside a window facing the outside.
  • There you have the water cycle.
Experiment B
  • Get a vivid marker and draw land with mountains and clouds.
  • Name each step of the water cycle.
  • Add some soda water - 50ml.
  • Add some baking soda, 1 teaspoon.
  • Then add some blue food colouring
  • At the middle of your ziplock, it locks put a strip of litmus paper in the middle and zip.
  • Put 20cm of double-sided tape.
  • Take off the side of the tape and set it inside a window facing the outside.
  • There you have a water cycle with CO2 added. (Carbon Dioxide)


Conclusion:

This experiment tells us more about the water cycle and how it works. In the experiment it showed
us how the water cycle would normally work, while the other one showed us more about when CO2
is added to the water.


Feedback from my buddy Milan:
Well done Lyan, this was very specific and written well. You’ve explained a lot with the steps and
the conclusion, you’ve given the materials clearer so when I do the experiment I know how much
water or what ziplock bag I need because when I do experiments and there are no correct
measurements the experiment fails. With the steps next time make sure it and not bullet points.
This work is amazing and there is nothing else that you need to work on.

Final Draft:
Title: Water Cycle Experiment 

Purpose: To learn how the water cycle works and to learn the impact of pollution in our water. 

Materials:
  • 2 ziplock bags,(A4 sized)
  • 200ml of water
  • Soda water - 50ml
  • Litmus paper 
  • Vivid Marker
  • Baking Soda 
  • Blue Food colouring 
  •   tape

Procedures:
Experiment A
  1. Get a vivid marker and draw land with mountains and clouds.
  2. Name each step of the water cycle.
  3. Then add some water.
  4. Then add some blue food colouring.
  5. Put 20cm of double-sided tape.
  6. Take off the side of the tape and set it inside a window facing the outside.
  7. There you have the water cycle.
Experiment B
  1. Get a vivid marker and draw land with mountains and clouds.
  2. Name each step of the water cycle.
  3. Add some soda water - 50ml.
  4. Add some baking soda, 1 teaspoon.
  5. Then add some blue food colouring
  6. At the middle of your ziplock, it locks put a strip of litmus paper in the middle and zip.
  7. Put 20cm of double-sided tape.
  8. Take off the side of the tape and set it inside a window facing the outside.
  9. There you have a water cycle with CO2 added. (Carbon Dioxide)

Conclusion:
This experiment tells us more about the water cycle and how it works. In experiment A it showed us
how the water cycle would normally work, while the other one showed us more about when CO2 is
added to the water.

Tuesday, May 7, 2019

Home Chemistry: Dirty Water Expierement

Aim: To make a filtration plant using household materials.

Image result for filtration science experiment
Water Filtration Plant

What is filtration?


Filtration is separating solids from liquids by adding a medium through which only the liquid can pass. 

Examples are:

  1.  Air Filtration 
  2.  Oil Filtration (Car)
  3.  Pool Filtration 
  4. Water Filtration 

Materials

1. Funnel 
2.Container
3. Filter
4. Pebbles
5. Dirty Water
6. Fine Sand 
7. Cup
8. Scissors

Process - ( use verbs or doing words in each step )


Step 1

Cut the bottle in half.

Step 2

Put the top half upside down on the bottom half, then put in filter paper. 

STEP 3

Add layers of fine sand and pebbles.

STEP 4

Get 1 cup of dirty water.

STEP 5

Pour the dirty water into the top half.

Findings

Write a short sentence about the water every 1 minute. 
Include 'How much water has filtered through', 'How fast it is dripping through', and 'How clear the water is'.


Minutes:                          1.                         2.                   3.                    4.                       5.
Drops per minute: 60 drops
Watercolour: Light Yellow
Conclusion: When we first started our didn't work because we poured the water ib too fast. So we had to start again but this time we put the sand and the pebbles in carefully especially the pebbles so the water doesn't go in the sides. We waited for a bit more but the water turned out to be quite yellow-ish. After that, we again grabbed some filter paper to make the water clearer. So we did it again and water was clear but still quite yellow-ish. Overall I really liked this experiment.